Hand Stripping Tutorial - Book 2
A series of articles by ARDEN M. ROSS - Illustrated by
MRS ROSS and LORI BUSH
Getting down to the "brass tacks" so to speak, we now have our dog standing on the grooming table; we are in the proper position and have reached over, lifted up a group of hairs and have started to pull. But something is amiss! Instead of the hair being pulled, the dog's skin is being pulled! This is because the dog's skin is loose. It is not like the skin on your own head; more like your body skin …. it stretches. Since the dog does not appreciate having his skin pulled up by the hair, we must hold the skin firmly, stretching the skin in the opposite direction to the way we are pulling. To do this, place your left hand on the dog's body, far enough ahead of the area to be pulled so that you are not interfering with the process. Firmly, but gently, push the skin forward and maintain just enough pressure on the dog's body so that the skin is tightened. We want the skin firm and close to the dog's body so that when we pull the hair, it comes out without lifting the dog's skin. It will, like the entire process, take a bit of practice. Soon you will be using your left hand, unconsciously to obtain the desired tautness of skin. In some places, like the sides of the neck, it will be necessary to grasp a fold of skin to obtain the desired effect and result. Be sure an effort is made to keep the skin taut here, mainly by grasping a fairly large fold of skin. You do not wish to pinch the dog. If too small a fold is used, the result may well be a "blood blister". This is naturally very unpleasant for the dog, and remember, we want to convince him that this is a "pleasurable" experience!
Here we are again in the proper position to begin stripping our dog, only this time we first reach over and placing our left hand on the dog, we firmly, but gently push away from ourselves with our left hand to tighten the dog's skin (see Diagram A). Something rather marvelous occurs, for as we push the dog's skin forward, the tightening motion of the dog's skin causes the hair to lift and separate, making it much easier for us to grasp the hair in the proper manner … how about that!

Once again, I must date myself to remind you of the old penmanship classes that were the basis of the child's learning to write in school. We were taught to use the whole arm in motion to form our letters. As you became used to it, many of us reduced the arm motion to merely the motion of our wrists, but the very worst possible form was to move only the fingers. This produced a tight, cramped scrawl. Much of this applies to pulling hair. When stripping great quantities of hair, I use my whole arm to produce the pulling motion. In "fine" stripping, I use wrist motion. There is only one particular place that only the fingers are in motion, and that is some very fine sculpturing around the eyes. It is very important when stripping that you do not twist your wrist (or hand) when you pull. The pull should be a smooth, straight pull, and in a downward motion instead of an upward motion. You lift the hair up, you pull back and down in one swift steady motion. It would be nice if I could tell you to allow your arm to assume a position that is the most comfortable to you, but this is not the case. Your arm will get tired, because in this case you must use YOUR body to achieve a specific result on your dog, and YOU are secondary. As you progress, you will learn to relax more and will develop a pattern of pulling that is most suited to you and your dogs. But this takes time.
Having read this far, you no doubt imagine you are ready to start stripping your dog. But NO! First you must learn to properly brush and comb him! Why else do you suppose that I listed two brushes and a comb as necessities? Here we deal with the dog "in the rough", as this is how you will start. The very first thing you will notice about him is that his coat is matted and full of tangles. If you are wise, you will form the excellent habit of keeping your ungroomed animals brushed and combed through at least once a week. Then when the day comes that you are ready to start earnest work on them, half the battle will be over.
Taking your slicker brush in your hand, you now start to brush your dog. Remember the slicker is very sharp, so care must be taken NOT to allow the wire bristles to come in contact with your dog's kin. This is the only time when you will brush the dog's body coat in the wrong direction (opposite to the direction that the coat grows). Our object at this time is not to form the coat, but simply to prepare it for pulling. So anything goes! We first brush in the proper direction (the way the coat grows), and we brush the dog all over. We hold the brush fairly loose, and rely on repetition rather than strength to brush through. As we brush the hair comes out in great quantities, mostly the soft undercoat, and our brush very quickly become clogged with hair. Remove the hair from the brush frequently, as it cannot do its job with the bristles full. After you are satisfied that you have gotten the coat as well brushed as you can in this manner, go over the whole body again (always do the leg furnishings last as they are more difficult to do properly), but this time brush the "wrong way" of the natural lay of the coat. When brushing the wrong way, we brush the hair with an upward motion. This helps to separate the hair remove the tangles and prevents the brush from coming in contact with the dog's skin. The skin will be exposed at this time by the backward brushing of the hair. As you come to individual tangles, brush the wrong way for a while and then reverse the process, brushing the right way. You will be surprised at how nicely the slicker removes tangles. Always remember to hold your brush loosely as you are trying to separate this hair; do not "yank" it out with your brush. After you have removed as many mats and tangles as is possible with the slicker, take your comb. You will be using the coarse end of the comb. Run it through the dog's coat where you have brushed, again using a light touch. Unlike the position of the stripping knife, you will hold the comb at an angle roughly paralleling the dog's body. This is to prevent the sharp teeth of the comb from cutting the dog. By holding the comb loosely, the comb can twist out of your hand if you hit a tangle. Our object is not really to drop our comb, and with a little practice you will soon develop the knack of holding it "just tight enough". When you hit the inevitable tangle, you change the position of your comb. You will point it at the dog! Here you are using the front tooth (still the coarse end) to separate the tangle. Insert the front tooth of the comb into a few hairs; repeat as often as necessary, working down towards the root of the tangle as you unravel it. When you have the tangle nicely worked out, run the comb through the worked-out tangle area in the usual manner. The comb should pass through the worked-out tangle with little or no pulling. If it does not, you have not worked out the tangle and you must use the front tooth again until you do. When I specify "front tooth", this is the one you will be working with, but the second and possibly the third tooth will more than likely become involved. The important thing is to remove the tangles and matts as painlessly as possible, and with as little loss of hair as possible. You want to be able to control the hair that is pulled; not just tear it out indiscriminately. Occasionally you may revert to the slicker brush to remove little tangles, or to loosen big ones. Use the brush and comb, one after the other to get the coat freed of mats and tangles. Now you are ready to start combing and brushing the furnishings.
Furnishings take a very, very long time to grow. When we start out with a puppy, the "puppy" is usually about two years old before we have the proper wealth of furnishings. Much depends upon the texture of the leg hair. The softer the hair … the more luxuriant the dog's furnishings …. BUT, the more it tangles and mats. The harder the hair on the legs, the more difficult it is to attain proper length and fullness. BUT, there is less matting and tangles. The furnishings are encouraged to be softer than the body coat, and indeed, as a general rule they are naturally of a different and less harsh texture. The whiskers, beard and full leg hair is what gives the Wire his distinctive appearance. If it were not for these qualities he would simply look like a harsh-coated Smooth. When we look at old drawings and paintings, we see that the Wire is only a trifle more shaggy than its Smooth brothers.
We can, literally, make or break our Wire's appearance by having too little or too much furnishings. We can definitely make our dog look like he is out at the elbow, cow-hocked or toeing-in (or out) by incorrect trimming of his furnishings. It is obvious that the furnishings are a very important part of our dog's coat, and in order to trim them correctly, we must have a goodly amount to work with. Whereas you can always take some off, you can never put hair that is not there, on. In view of these facts, very special care must be taken at all times. The combing and brushing of this "all important hair" must be done carefully so as to avoid taking out the hair. There is nothing so heart breaking as having a hole in your dog's furnishings. Nothing can be done to disguise it, although it is sometimes possible to straighten it out. But here too, we loose much valuable hair in this process, and our animal appears "top-heavy", as taking down one leg necessitates taking down the other, etc.

When handling the furnishings, BE CAREFUL ..... very careful! Brushing the leg hair is done in the same manner as we used on the body coat ... first the slicker brush is used, but here we do more brushing outward and upward (see Diagram B). It is to be hoped that you never allow your dog's leg hair to become badly matted. If this is the case, then you must do the best you can, and just plan on not showing him until his hair grows in again. On extremely bad mats, it is sometimes necessary to cut some of the mat to get it to release. We do not "cut the mat out"; what we do is to cut through the ends of the mat. This helps to release the hairs so that they may be unraveled. Let us sincerely hope that you do not find any "Gordian Knots" in your dog's furnishings; if you do, we must copy "Alexander" and cut through them.
Hold the slicker brush very lightly in your hand. After you have brushed a few strokes, look at your brush and see how much hair you are getting out. If it is more than a very few, you are using too heavy a hand. Lighten your stroke and try again, rechecking your brush after a few strokes. Brush the hair upward and outward, being extremely careful not to let the wire bristles come in contact with the dog's skin. If you irritate the skin on the legs or feet, the dog will lick and/or chew it, eventually destroying all your efforts. Use the front teeth of your comb with your slickering to remove the tangles. Your object is to thoroughly brush and comb through the furnishings so that a comb may pass through all the furnishings without removing a single hair, or becoming caught in a single tangle while at the same time achieving full and fluffy leg hair with no holes in them. After all the tangles have been removed, take your palm brush, and still using a light touch, stroke the hair upward (see Diagram C). This is to fluff the furnishings out.

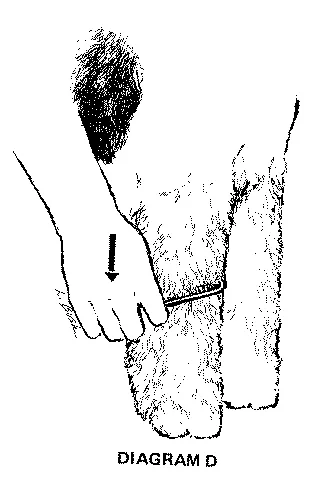
Now take your comb and run it lightly downward all around each front leg. Your object is to arrange the hair in the pattern it will be in for a show coat. You may now observe how this leg hair lays and determine what needs to come off and what needs to remain ... and how much of both. The hind legs are done in the same fashion, except that the front legs are somewhat like columns and the hind legs have curves and bends. Remember what I told you about having a picture in your mind (see Diagram D) of how you want your dog to look? Comb the hind legs to conform to the picture.
Now you are ready to start stripping!
Many thanks to Terrier Type for permission to reprint these pages
